Mipmap은 레벨에 따라 다른 해상도의 이미지를 사용한다.
샘플러의 Filter에서 MIN, MAG, MIP 을 설정할 수 있다.
MIP을 POINT로 설정하면 여러가지 해상도의 이미지 중 하나를 선택해서 레벨에 따라 계단식으로 이미지의 디테일이
결정되고 LINEAR로 하면 그 사이가 선형으로 보간되어 레벨에 따라 더 자연스럽게 이미지의 디테일이 변한다.
MAG는 이미지를 크게 표현할 때, MIN은 이미지를 작게 표현할 때 사용하는 필터를 결정하는 것이다.

Texture2DArray를 이용해 Texture 여러개를 받을 수 있었다. 그 Texture 각각 Mipmap을 생성할 수 있고, Texture 하나의
Mipmap들을 Array Slice라고 부른다.

그리고 같은 레벨의 Mipmap들끼리 묶는 것을 Mip Slice라고 한다.
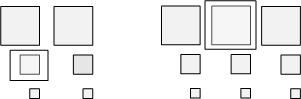
이것들을 다 묶어서 Resource라고 하고 하나씩 골라서 SubResource라고 한다.
    int width, height;
    std::vector<uint8_t> image;

    ReadImage(filename, image, width, height);

    // 스테이징 텍스춰 만들고 CPU에서 이미지를 복사합니다.
    ComPtr<ID3D11Texture2D> stagingTexture =
        CreateStagingTexture(device, context, width, height, image);
이제 CreateTexture에서 MipMap을 만들어보자. 먼저 이미지를 읽어 image 벡터에 저장하고,
현재는 해상도가 가장 높은 이미지 하나만을 가지고 있는데 그것을 이용해 StagingTexture을 만든다.
CreateStagingTexture에서 StagingTexture을 만들고 GPU에서 CPU로 그것을 복사한다.
    txtDesc.MipLevels = 0; // 밉맵 레벨 최대
    txtDesc.ArraySize = 1;
    txtDesc.Format = DXGI_FORMAT_R8G8B8A8_UNORM;
    txtDesc.SampleDesc.Count = 1;
    txtDesc.Usage = D3D11_USAGE_DEFAULT; // 스테이징 텍스춰로부터 복사 가능
    txtDesc.BindFlags = D3D11_BIND_SHADER_RESOURCE | D3D11_BIND_RENDER_TARGET;
    txtDesc.MiscFlags = D3D11_RESOURCE_MISC_GENERATE_MIPS; // 밉맵 사용
    txtDesc.CPUAccessFlags = 0;
그리고 실제로 사용할 텍스쳐를 설정하는데 MipLevels를 원래는 1로 했다. 1로 설정하면 가장 해상도가 높은 이미지 하나를 사용한다는 거지만 0으로 설정하면 만들 수 있는 최대 개수의 밉맵을 만든다. (64*64 , 32*32.. ..2*2,1*1)
StagingTexture로부터 복사해야하므로 Usage는 IMMUTABLE이 아닌 DEFAULT, MiscFlags는 Mipmap을 사용하기 위해
MISC_GENERATE_MIPS로 설정한다.
  // 초기 데이터 없이 텍스춰 생성 (전부 검은색)
    device->CreateTexture2D(&txtDesc, nullptr, texture.GetAddressOf());

    // 스테이징 텍스춰로부터 가장 해상도가 높은 이미지 복사
    context->CopySubresourceRegion(texture.Get(), 0, 0, 0, 0,
                                   stagingTexture.Get(), 0, nullptr);

    // ResourceView 만들기
    device->CreateShaderResourceView(texture.Get(), 0,
                                     textureResourceView.GetAddressOf());

    // 해상도를 낮춰가며 밉맵 생성
    context->GenerateMips(textureResourceView.Get());

    // HLSL 쉐이더 안에서는 SampleLevel() 사용
그리고 초기 데이터 없이 텍스쳐만 생성해서 메모리만 잡아주고 가장 해상도가 높은 이미지를 복사한다. Texture을
쉐이더에 넣어주기 위해 ShaderResourceView를 만들고 GenerateMips를 통해 Mipmap을 만든다.
   // StagingTexture를 만들어서 하나씩 복사합니다.
    for (size_t i = 0; i < imageArray.size(); i++) {

        auto &image = imageArray[i];

        // StagingTexture는 Texture2DArray가 아니라 Texture2D 입니다.
        ComPtr<ID3D11Texture2D> stagingTexture =
            CreateStagingTexture(device, context, width, height, image, 1, 1);

        // 스테이징 텍스춰를 텍스춰 배열의 해당 위치에 복사합니다.
        UINT subresourceIndex =
            D3D11CalcSubresource(0, UINT(i), txtDesc.MipLevels);

        context->CopySubresourceRegion(texture.Get(), subresourceIndex, 0, 0, 0,
                                       stagingTexture.Get(), 0, nullptr);
    }
TextureArray의 Mipmap을 생성할 때는 StagingTexture을 복사하는 것을 ArraySize만큼 반복하는데,
D3D11CalcSubresource를 이용해서 복사할 위치를 계산해줘야 한다.
  // diffuse *= g_texture0.Sample(g_sampler, input.texcoord);
     diffuse *= g_texture0.SampleLevel(g_sampler, input.texcoord, mipmapLevel);
그리고 이제 PixelShader에서 샘플링할 때 Sample이 아니라 mipmalLevel을 추가한 SampleLevel을 사용한다.
mipmapLevel이 0일 때 가장 해상도가 높고 레벨이 올라갈 수록 해상도가 낮은 이미지가 샘플링된다.
'그래픽스' 카테고리의 다른 글
| [그래픽스] Height Map (0) | 2023.07.21 |
|---|---|
| [그래픽스] Normal Mapping (0) | 2023.07.21 |
| [그래픽스] Hull Shader, Tessellation, Domain Shader (0) | 2023.07.21 |
| [그래픽스] Geometry Shader (0) | 2023.07.19 |
| [그래픽스] 쿼터니언(실습) (0) | 2023.07.19 |


